Wednesday, May 19, 2010

Strawberry-Hazelnut Cream Tart

I have taken to making goodies every week for my husband to take to work as dessert. Old-fashioned? Perhaps. A great excuse for me to experiment with every delicious-looking recipe from the plethora of cooking magazines that we subscribe to? Absolutely!

When I asked DH last week what he wanted, the response was, "something fruity". Given that strawberries have recently come into season in the Southern states, they are available at all of our local markets at ridiculously discounted prices compared to the rest of the year. Strawberries it was...but what to make? After flipping through the May Cooking Light, I decided on this Strawberry-Almond Cream Tart. Despite the name of the magazine, I have found that CL recipes can sometimes use a little tweaking in order to make me comfortable with them, and hello - my husband is going to be eating a piece of this every day after lunch, something to keep in mind when determining where to splurge!

The recipe below includes my substitutions. This recipe only uses half of the strawberry "topping", so if you don't want to have any leftover, you can cut that part in half.

Strawberry-Hazelnut Cream Tart
Adapted from Cooking Light

Crust 9 Sheets Reduced-Fat Graham Crackers (crushed)
2 T sugar
2 T Smart Balance (or similar)
4 tsp water
Cooking spray

Filling
2.5 oz. Fat-free cream cheese
2.5 oz. 1/3-less-fat cream cheese
1/4 cup sugar
1/2 tsp vanilla extract
1/4 tsp almond extract

Topping
6 cups small fresh strawberries (hulled)
1/2 cup sugar
1 T cornstarch
1 T fresh lemon juice
2 T chopped toasted hazelnuts (we didn't have almonds so used hazelnuts, but either would be good)
Preheat oven to 350. To prepare crust, place all crust ingredients in a food processor and process until it comes together into a loose ball. Place the mixture in the bottom of a 9-inch tart pan lightly coated w/ cooking spray. Press the mixture into the bottom and slightly up the sides. Bake for 10 minutes, or until lightly browned. Cool completely on a wire rack.

To prepare filling, combine cream cheeses, sugar and extracts in a medium bowl and stir until smooth. Spread mixture evenly over the cooled tart shell. To prepare filling, place 2 cups of strawberries in a food processor and puree until smooth. Combine the puree, sugar and cornstarch in a small saucepan over medium heat and stir with a whisk. Bring the mixture to a boil, stirring constantly. Reduce heat to low and cook for 1-2 minutes or until the mixture begins to thicken. Cool to room temperature, stirring occasionally.

Combine the remaining strawberries with the lemon juice and toss to coat. Arrange the berries, bottoms up, in a circular pattern over the cream cheese filling. Spoon half of the strawberry glaze over the whole strawberries. Sprinkle nuts around the edges, cover and chill at least 3 hours (or overnight).

Friday, February 12, 2010

Pretzel Bites

My parents are coming today to visit for the weekend, and I wanted to make a bunch of snack-y little things to put out while we're catching up. I've used this recipe to make full-sized pretzels back when I was just getting into bread baking, and had great (if not very pretty) results. With the Superbowl last weekend, I had seen a few blogs that had these little pretzel bites, some stuffed and some not. I experimented with this batch and stuffed some of them with little cubes of smoked mozzarella, but between the boiling and baking, the stuffed ones didn't hold their shape and the cheese leaked out...not pretty. So, I stuck with the plain ones for what I will serve my parents. Along with replacing the butter with olive oil, I also cut this recipe in half, and ended up with over 2 dozen little bites. Actually, I ended up with about 30 little bites, but they looked so wonderful I couldn't resist snacking on a few!


Pretzel Bites

Adapated from Alton Brown

1 1/2 cups warm water
1 tablespoon sugar
2 teaspoons salt
1 package active dry yeast
22 ounces all-purpose flour, approximately 4 1/2 cups
2 ounces unsalted butter melted
10 cups water
2/3 cup baking soda
1 large egg yolk beaten with 1 tablespoon water
Pretzel salt

In a small bowl, combine the water, sugar yeast, and allow to sit for 5 minutes or until the mixture begins to foam. To the bowl of a stand mixer, add the flour, salt and butter and, using the dough hook attachment, mix on low speed until well combined. Change to medium speed and knead until the dough is smooth and pulls away from the side of the bowl, approximately 4 to 5 minutes. Remove the dough from the bowl, clean the bowl and then spray with olive oil spray. Return the dough to the bowl, toss to cover with the oil, cover with plastic wrap and sit in a warm place for approximately one hour, or until the dough has doubled in size.

Preheat the oven to 450 degrees. Line 2 half-sheet pans with parchment paper and lightly brush with the vegetable oil. Set aside.

Bring the 10 cups of water and the baking soda to a rolling boil in an 8-quart saucepan or roasting pan.

In the meantime, turn the dough out onto a slightly oiled work surface and divide into 8 equal pieces. Roll out each piece of dough into a 24-inch rope. Make a U-shape with the rope, holding the ends of the rope, cross them over each other and press onto the bottom of the U in order to form the shape of a pretzel. Place onto the parchment-lined half sheet pan.

Place the pretzels into the boiling water, 1 by 1, for 30 seconds. Remove them from the water using a large flat spatula. Return to the half sheet pan, brush the top of each pretzel with the beaten egg yolk and water mixture and sprinkle with the pretzel salt. Bake until dark golden brown in color, approximately 12 to 14 minutes. Transfer to a cooling rack for at least 5 minutes before serving.

Thursday, February 11, 2010

Dutch Oven Herb Bread

I've seen a few recipes for this on blogs lately, and thanks to the amazing Dutch oven that I got from my in-laws for Christmas, I knew it was something I wanted to make! I looked through a few of the recipes, and decided on this one from Homemade by Holman, since after browsing through other recipes on her blog there wasn't one that didn't make my mouth water! She adapted her version a little from the Pioneer Woman's blog, and after looking at that version too, I decided on a combination of the two, with a little change of my own - olive oil instead of melted butter. Also, I only had fresh thyme, so that was the only herb I used and I added a little fresh cracked black pepper too, since I love the way it looks in white bread. This was so easy to make, and the end result is gorgeous! I haven't dug into it yet, since I want my husband to see how beautiful the finished product is, but it smells so good, I can't wait!

Dutch Oven Herb Bread
Adapted slightly from Homemade by Holman
and Pioneer Woman

4 cups bread flour
2 tsp. salt
1 tsp. fresh cracked black pepper
4-5 springs fresh thyme
1 tsp. olive oil
2 cloves of minced garlic
1 tsp. active yeast
1 cup lukewarm water (my dough required more like 1 1/4 cups)

Combine yeast and water let sit while you measure the remaining ingredients. Chop herbs and garlic. Add flour, olive oil, salt, pepper, herbs and water/yeast mixture to the bowl of a stand mixer fitted with the dough hook. Mix together, adding additional water 1 tablespoon at a time until all of the flour has been picked up and forms a ball. Knead about 10 minutes, or until dough passes the "windowpane test" (tear off a small piece of dough and stretch it, it should be somewhat translucent instead of tearing).

Spray a large bowl with olive oil spray, form the dough into a ball and place in bowl, tossing around to coat the bread. Cover with plastic and let rise for 1-4 hours until doubled in size. Mine was good to go after about 2 hours.

Spray a 6-8 quart dutch oven with more olive oil spray, and place it in the oven while it preheats to 450 degrees. Punch down dough and form into a smooth ball. Transfer the dough to the hot dutch oven (carefully)! Cut a large, deep "X" into the top of the dough. Cover and bake about 20 minutes. Remove lid and continue baking for about 15-25 more minutes until the top is crusty and light golden brown.

Thursday, January 7, 2010

Bitter Chocolate Tart

This is the dessert that I made when we hosted the in-laws for Christmas Eve dinner, and I've been meaning to post it ever since. It's from Mario Batali's Molto Italiano cookbook, which until Christmas had been my current favorite. Since I've received the Babbo cookbook, among others, for Christmas, I have to admit this one hasn't been feeling the love. However, there are a ton of great recipes and I would highly recommend the book to anyone. The recipe section of this book inspired me to buy a tart pan...in August. It sat in the closet unused until I decided to try this recipe out. I'm not very confident in the baking arena, and making my own crust seemed out my league. I was surprised by how easy it was, once I let go of my fear of butter and decided to bite the bullet - it WAS for Christmas after all! One thing though - this receipe says that it serves 8. There were 7 people are our dinner, and we barely ate 1/3 of this, it's so rich that a little goes a very long way.

Bitter Chocolate Tart
From Mario Batali's Molto Italiano
Serves 8

For the pastry
1 1/2 cups all purpose flour
1/2 tsp. salt
1/4 cup confectioner's sugar
1/2 tsp. ground cinnamon
9 tbl. cold unsalted butter
1/4 vin santo (or other sweet dessert wine)

For the filling
1 1/2 cups heavy cream
10 1/2 oz. bittersweet chocolate, finely chopped
2 whole eggs
1 egg yolk
2 tbl. unsweetened cocoa powder
1 tsp. crushed anise seeds
1 tbl. anise liquor (I used Sambuca)

For the glaze
1 cup confectioner's sugar
2 tsp. anise liquor
1 1/2 tbl. milk (or as needed)

To make the pastry, combine flour, salt, sugar and cinnamon in a food processor and pulse to mix. Add the butter and pulse until the mixture resembles coarse crumbs. With the processor running, add the vin santo and process until the dough comes together. Place the dough on a sheet of plastic wrap, flatten to a disk, wrap tightly and refrigerate for at least 30 minutes.

Butter a 10-inch fluted (optional) tart pan. Roll out the chilled dough between sheets of plastic until you have a circle about 1/4 inch thick. Line the tart pan with the dough, trim off the excess and refrigerate 20-30 minutes.

Preheat the oven to 400 degrees. Prick the bottom of the tart dough with a fork, and bake 12 minutes, or until just set. Set the shell aside, and reduce the oven temperature to 375 degrees.

To make the filling, heat the cream to a simmer in a medium saucepan. Remove from the heat and add chocolate, stirring to melt. Transfer the chocolate to a bowl and set aside to cool. In a separate bowl, beat the eggs and yolk together with the cocoa, then whisk the egg mixture into the cooled melted chocolate. Add the crushed anise seeds and anise liquor, and stir to combine. Pour the filling into the tart and bake for 15 minutes, or until the filling forms a shiny skin and is slightly firm, but just a little loose in the middle (in my oven, this took 19 minutes). Cool the tart in the pan for 15 minutes, then remove the sides and cool completely.

To make the glaze, combine the sugar, anise liquor and milk, and whisk until you have a thin, pourable consistency; add a few drops more of milk if needed. Place the glaze into a small ziplock bag, and cut of just the tiniest piece of one corner. Pipe the glaze onto the cooled tart in whatever fashion you like. Allow the glaze to harden (about 5 minutes) before serving.

This tart is so amazingly delicious, and this is from someone who doesn't really love anything anise flavored. I made a "test version" of it and brought it to my office where there are people who claim to hate anise, and they didn't even know it was there. It doesn't flavor the tart, but I think it's one of those ingredients that you can't put your finger on but would miss if it weren't there. It's certainly enough on it's own, but to dress it up for Christmas Eve, we served it with a little homemade cinnamon whipped cream. It was definitely a perfect way to end the meal.

Lighter Mac & Cheese


It's certainly that time of year when I'm craving a little "comfort" food, which for me doesn't usually includes things like Mac & Cheese. However, since receiving these adorable mini Le Cruset crocks at Christmas, I've been dying to make something gooey and cheesy in them! I apologize for the photo, I need some serious help when it comes to photographing food, which is one of my goals for the new year. Hopefully I'll get it together and start to take better photos like the beautiful photos in the all of the blogs that The Nest girls maintain.

Lighter Mac & Cheese
Created by me!
Serves 2

3/4 cup whole wheat penne pasta (or your favorite short cut pasta shape)
1/2 cup butternut squash, cut into a small dice
1/4 cup 1% milk
1 tbl. butter (I use Smart Balance sticks)
1/2 tbl. flour
1/2 cup reduced fat shredded cheddar cheese (plus more for topping)
1/2 cup lowfat or fat free cream cheese
2 tbl. breadcrumbs
Salt & Pepper to taste
Parsley for garnishing (optional)

Preheat the oven to 350 degrees. Bring a medium pot of salted water to a boil, then add the squash and pasta and cook according to the directions for your pasta, draining a little shy of al dente. The squash should be softened. Place the drained pasta and squash back into the pasta pot over medium heat, add milk, butter and flour and stir until the flour has been absorbed and the milk is almost gone, about 2-3 minutes. Add the cream cheese, cheddar cheese, salt and pepper - stir to combine. Divide the mixture between two small oven-proof crocks, or one small baking dish. Top with additional cheese, if desired, then breadcrumbs. Spray the top with olive oil spray and bake 15-20 minutes or until the cheese is bubbly and golden brown. Sprinkle with parsley and serve...guilt free!

Wednesday, December 30, 2009

Pork Chops Milanese with Arugula Salad


Another night, another great recipe from Mario’s Babbo cookbook. My husband picked this one out, and said he knew I’d like it because it “only has one tablespoon of butter”. He’s so thoughtful! I am not usually a fan of anything breaded and pan fried, I just prefer to use other methods of cooking and make healthier meals for my husband and I. I wasn’t really looking forward to this one, and for me the breading was a little heavy, but the flavor was certainly delicious.

Pork Chops Milanese with Arugula Salad
Adapted from Mario Batali
Serves 4

4 center cut pork chops
Salt & pepper to taste
2 eggs
1 cup breadcrumbs
1 tsp. garlic
1 tsp. dried basil
1 tsp. dried oregano
Olive oil cooking spray
1 tbls. butter
4-6 cups of arugula
1 pint grape tomatoes
1 tbls. lemon juice
1 tbls. olive oil
1 lemon, cut into quarters (optional)

Using a mallet or a small heavy pan, pound each pork chop to about ¼ inch thickness. Season pork chops liberally with salt and pepper. In a shallow bowl or plate combine the breadcrumbs with salt, pepper, garlic, basil and oregano (if you’re using Italian seasoned breadcrumbs you can skip this whole step). In another bowl beat eggs with a splash of water, salt and pepper. Heat a large non-stick pan over medium heat and spray with olive oil and add butter. When the pan is warm and the butter has melted, dip each pork chop first in the egg, then into the breadcrumbs, pressing the crumbs so they adhere to the pork. Place the chops in the pan (you may need to do this in two batches) and cook, turning once, until brown on both sides – about 10-12 minutes total.

In a large bowl, combine the arugula, tomatoes, salt, pepper, lemon juice and olive oil. Be sure to add the lemon juice before the olive oil, or else the juice won’t be able to start breaking down the greens. On each plate place one pork chop and top with the salad. Serve each plate with a wedge of the lemon for squeezing over the pork, it really brightens up what is otherwise a pretty heavy breading.

Tuesday, December 29, 2009

Fennel and Orange Salad


This would have been infinitely easier and quicker with a mandolin, but given my track record of cuts, scrapes, burns and stabbings in the kitchen, my husband wouldn’t be able to sleep at night if there were a mandolin in the house – so, I had to do it the old fashioned way.

Fennel and Orange Salad
Adapted from Lidia Bastianich
Serves 4 as a side

1 large or 2 small bulbs fennel
3 oranges
¾ cup black olives (use your favorite – we like kalamata)
1 tsp. salt (plus more to taste)
1 tsp. fresh ground black pepper
1 tsp. lemon juice
2 tbl. olive oil

Cut fennel bulb(s) in half and cut out the hard inner core. Thinly slice fennel and place in a medium bowl. Cut the peel from the oranges, being sure to remove all of the bitter white part. Segment the oranges by cutting them into “supremes”, cutting the flesh away from the membrane that separates the segments. Cut each segment in half, and add to the bowl. Cut the black olives in half and add to the bowl. Add the salt, pepper, lemon juice and olive oil and toss to combine. We like to let this sit at room temperature for 20-30 minutes before eating to soften the fennel a bit and let the flavors combine, but it’s perfectly delicious right away too.

Pollo Con i Carciofi


This Christmas I really made out in the cookbook department!! I got books from two of my favorites, Mario Batali and Lidia Bastianich, as well as another amazing country-style Italian cookbook and both volumes of Julia Child’s Mastering the Art of French Cooking. Let’s just say we better renew the gym memberships for 2010, because it’s going to be a year of eating very well!

I love Lidia’s book because it’s arranged with recipes by region instead of by course. This might be annoying to some, but I love it, since it means less work for me when it comes to the question of what to serve with what. And, since flavors from the same region tend to naturally go well together, she kind of makes creating an entire meal a no-brainer.

Last night’s dinner was from the Lazio region, which includes Rome. Romans are all about bold flavors, and letting their food speak for itself instead of “covering” it with seasoning and overloading it with fancy ingredients. Two staples of Roman cooking happen to be two of my favorite vegetables, artichokes and fennel, and what could be better than putting them together? The chicken was cooked perfectly, and we had some homemade bread on the side for mopping up all of the sauce, yum!

Pollo Con i Carciofi
Adapted from Lidia Bastianich
Serves 4

4 boneless skinless chicken breasts
2 tablespoons olive oil
4 cloves of garlic (peeled and crushed)
4 artichokes (chokes removed and quartered) (or 8 baby artichokes, much easier!)
1 cup dry white wine
2 tsp. crushed red pepper flakes (or to taste)
1 tsp. salt
1 large (48 oz.) can San Marzano tomatoes (with their juice)
1-2 cups water
2 tbls. parsley (finely chopped) for serving
Grated Parmesan or Romano cheese for serving (optional)

To prepare the artichokes fill a bowl with a few cups of cold water and the juice of one lemon. Remove the tough bottom leaves of each artichoke until you reach the softer, pale inner leaves. Cut about ¼ inch off the bottom of the stem, and peel the remainder of the tough skin off the stalk. Cut the top 3rd off of the artichoke and cut it in half the long way (cutting the stem in half). If you’re using baby artichokes there is not usually a “choke”, and you can just place the halves into the acidulated water. If you’re using mature artichokes, you’ll need to remove the fuzzy “choke”. We’ve found the best way is to use spoon to scoop it out. Once you’ve removed the choke, cut each half into two pieces and place them all into the acidulated water.

In a large heavy-bottom pot (like my brand new 6.5 quart Le Cruset oval – thank-you in-laws!) heat the olive oil over medium heat until almost smoking. Season chicken breasts with salt and place them in the pot, browning on both sides – about 8 minutes. Remove chicken and add the crushed garlic cloves. Remove the artichokes from the water with a slotted spoon and add them to the pot. Cook the artichokes and garlic about 4-5 minutes, or until the artichokes begin developing a golden brown color. Add the wine and crushed red pepper flakes, and cook until almost all of the liquid has reduced, about 5-6 minutes. Using your hands (this is the fun part!) crush the tomatoes into large pieces and add them to the pot. Depending on how juicy your tomatoes are slosh the 1-2 cups of water around the tomato can and add to the pot, along with the salt. Reduce heat to simmer and cover. Cook 10-15 minutes, then remove lid and cook an additional 10-15 minutes, depending on how thick you’d like the sauce to be.

On the plate, spoon sauce and artichokes over chicken, sprinkle with parsley and cheese and enjoy!

Monday, December 21, 2009

Spain!

I know, it's been forever since I posted, but for good reason (and not a pregnancy, which seems to be in the water lately!) - My husband and I were planning and then enjoying our Thanksgiving holiday in Spain! We flew to Madrid the Wednesday before Thanksgiving week and stayed until the Sunday after. Our itinerary was mad-dash in order to squeeze the places that were on our "must" list...and this was AFTER we both made some concessions of places we wanted to see. This was our schedule:

Day 1 - Arrive in Madrid at 10am, taxi to the AVE train station, then high-speed train to Cordoba to spend the afternoon and night.
Day 2 - Cordoba in the morning then high-speed rail to Seville for the afternoon and night.
Day 3 - Seville in the morning, then (very) slow train to Granada
Days 3/4/5 - Granada - we planned a little more time here than some other locations in order to spend one entire day touring the Alhambra, and it's a good thing we did, we could have stayed there another day!
Day 5 - Granada in the morning, then we picked up our Mini and were off to the Costa Blanca. We drove along the coast until we reached Altea, a gorgeous Mediterranean seaside town that I would happily spend the rest of my life in!
Day 6 - Altea in the morning then we drove inland through Castille La Mancha to Cuenca, where we stayed at the only Paradore of our trip, and got to view the gorgeous "hanging" houses.
Day 7 - Depart Cuenca for Toledo, and say goodbye to the Mini :( We spent the afternoon and night in Toledo.
Day 8 - Toledo in the morning, then high-speed rail for the quick trip back to Madrid.
Days 8/9/10/11 - Madrid. We wanted to spend a good amount of time here for two reasons, 1 to relax from our whirlwind, and 2 to see everything without feeling frantic. It was amazing, we were able to go to the Prado, Thyssen and Reina Sofia museums, the Royal Palace, Botanical Gardens, El Retiro park and SO much more. Even better, they were setting up for Christmas when we got there, and the next night there was a tree-lighting and huge concert outside in one of the squares a few blocks from our hotel. There was so much energy, it was amazing to be there to be part of it!

Tuesday, October 20, 2009

Barefoot Bloggers - Blue Cheese Souffle


This was a great base recipe that really lent itself to tweaking to meet my (in my husband's words "fat nazi") requirements. I'm really not that bad, all things in moderation, and where there are strong flavors, like the blue cheese in this recipe using a huge amount is not necessary. So, here's our version adapted from Ina! I will say that Ina's recipe is for one large souffle, but since it's just the two of us here in the Beviamo house (and we don't own a large souffle dish), I cut the recipe down to two individual servings.

Blue Cheese Souffle
Adapted from: Ina Garten

1 tablespoon butter
1/4 cup parmesean cheese
1 1/2 tablespoons flour
1/2 cup 1% milk
Salt & pepper to taste
Pinch freshly grated nutmeg
Pinch cayenne pepper
2 large eggs
2 egg whites
Pinch cream of tartar
1-2 oz. good quality blue cheese (we used Danish blue)

Preheat oven to 400 degrees. Spray 2 small ramekins with cooking spray and sprinkle with 1/2 of the grated parmesean cheese. Shake to coat, and shake out excess. Melt the butter in a small saucepan over medium-low heat until bubbling, then add flour and wisk to combine. Cook for 1-2 minutes, and turn heat to medium. Add milk (room temperature is best) to flour mixture, wisking continuously. Add salt, pepper, nutmeg and cayenne pepper. Continue wisking mixture over low heat until it is smooth and has thickened, about 3-4 minutes. Remove from heat and add the two whole eggs, slowly, while wisking continuously (you don't want scrambled eggs!). Add remaining parmesean cheese along with the blue cheese, wisking until the cheese has melted and combined.

In a separate bowl using a stand or electric hand mixer, beat the remaining egg whites until foamy, then add cream of tartar and beat until the whites hold stiff peaks. Fold the whites into the egg/flour mixture in three increments, being sure to fold the whites carefully so you don't remove all the air. Once combined, divide the mixture between the two ramekins, place both ramekins on a baking sheet and place in the oven (middle rack). Bake 20-25 minutes or until puffy and golden on top. Don't cheat and open the oven while the souffles are cooking, they are so light from the egg white that even a little draft can cause them to sink :(

Thursday, October 8, 2009

Barefoot Bloggers: Cheddar Corn Chowder


This was my first Barefoot Bloggers recipe, and I have to admit that I wasn’t too excited about it. Being from New England you would like that I’d love chowder, however growing up working at clam bakes and lobster boils pretty much destroyed all appreciation and awe of things like chowder, steamer clams and the like. However, I wasn’t going to let that stand in the way of my very first recipe, so I just ended up making a few adjustments and I think the result was pretty good.

First, I am always trying to be aware of the fat and calories in what I cook…and in that regard, I’ve tried all kinds of turkey bacon, and there is just nothing that I’ve found that can even come close to a fatty pork bacon, so I’ve given up on that one. Using real bacon, I balanced this recipe by using fat free ½ and ½ instead of the “real” stuff, reduced fat extra sharp cheddar and cutting out the olive oil that the original recipe called for. I just did not see the need for it, with all the bacon and butter. The final product looked great, but was missing something (admittedly, this was probably my own fault since if I’d used all of the fat the recipe calls for I’m sure it would have been richer!), so we dressed it up at the end with some smoked paprika and fresh cilantro for a pop of color, and it was great.

As a note, I only made ¾ of the recipe, and it was STILL enough for my husband and I, and there was even some left over from that!

Cheddar Corn Chowder
Adapted from Ina Garten
Makes 3-4 Servings

2 slices bacon - chopped
1 yellow onion – chopped
1 tablespoon butter
1 tablespoon flour
½ teaspoon salt
¼ teaspoon black pepper
1 pinch turmeric
3 cups chicken stock
1 medium potato – medium diced
½ bag frozen corn kernels (or two ears fresh corn*)
½ cup half and half
3 ounces sharp white cheddar cheese – grated

*Note – if you’re using fresh corn off the cob, you will need to blanch the kernels first in salted boiling water for about 3 minutes.

In a medium stockpot over medium heat cook the bacon until crispy. Remove from pot with a slotted spoon. Add the onions and butter to the pan and cook until onions are translucent, about 5-10 minutes. Stir in the flour, salt, pepper and turmeric and cook for 2-3 minutes and then add the chicken stock and potatoes. Bring to a boil, then reduce to simmer and cook uncovered until potatoes are tender – about 15 minutes. Add the half and half and cheese, and cook 5 more minutes, or until all of the cheese has melted and the cream has thickened the chowder. Season again with salt and pepper, if desired – and serve with the reserved bacon crumbled over the top.

All in all this came out really well for something that I have zero experience making. I’m glad I added the cilantro at the end though, the little pop of color definitely made it look much more appealing to me.

Thursday, September 17, 2009

Fresh Tuna Rolls Messina

Near my work there is an awesome grocery store that has the best fresh fish. My husband and I shop there at least once a week and buy whatever looks best, usually without knowing what we'll do with it. This week was tuna. So, another trip to my Batali book, and this is what we ended up with. The picture does not do it justice, it was sweet, salty, smooth and crunchy all at the same time.

Tuna Rolls Messina Style
from Mario Batali's Molto Italiano
Makes 4 Servings

1/4 cup olive oil
2 anchovies, rinsed
1 medium onion diced
6 tablespoons pine nuts
6 tablespoons curr
ants or raisins
zest of two oranges
1 cup fresh bread crumbs (I used Panko)
4 tuna steaks, each sliced into three thin cutlets
1/2 cup parsley
2 cups tomato sauce
1/4 cup black olives
2 teaspoons red pepper flakes
1/2 cup dry white wine

Preheat the oven to 450. In a medium skillet, heat the oil over medium heat and add the onion, anchovies, 1/2 of the pine nuts and currants and cook until the anchovies dissolve. Add the orange zest and breadcrumbs and cook, mixing constantly, until the breadcrumbs are golden brown (about 5 minutes) then remove from the heat, add the chopped parsely and cool. Meanwhile, flatten the tuna cutlets as thin as you can, about 1/8-inch thick. Heat the tomatoe sauce in a small pan, and add the remaining pine nuts and currants and the olives and red pepper flakes. D
ivide the breadcrumb mixture evenly between the tuna, and roll each one up like a jelly roll, securing with toothpicks if necessary. Pour half of the sauce into a baking dish, and place the rolls on top. Spoon the remaining tomato sauce over the top and bake about 15-20 minutes, or until the tuna is cooked through and the filling is warm. Allow to stand for about 10 minutes after removing from the oven.


Homemade Ricotta Cheese

This sounded so intimidating to me, but I've seen it on several blogs and wanted to give it a try. Honestly, it is dead easy, and so good. I may have used too much lemon but the subtle lemon flavor went awesome with the fried zucchini flowers.

Homemade Ricotta Cheese
From epicurious.com

4 cups milk (any fat content except skim)
1 cup cream (fat free 1/2 and 1/2 works okay too)
1 tablespoon lemon juice

Line a collander with cheese cloth and place over a large bowl. Heat the milk and cream together over medium high heat, stirring occasionally. As soon as it reaches a rolling boil, add the lemon juice and stir. Reduce the heat to a simmer and let the mixture sit for one minute. Gently stir it up again, separating the curds from the whey. Turn off the heat and let the mixture sit for one more minute. Poor the mixture into the collander and allow to sit for about an hour, or until cool.

This will keep in the fridge for 4-5 days.

Fried Zucchini Flowers with Goat Cheese

This is from my current favorite, Molto Italiano by Mario Batali. I've been watching a lot of Lydia Bastianich on the Create channel, and I recently learned that her son is Mario Batali's business partner, and an amazing fountain of knowledge when it comes to Italian wine. I think finding this out raised Mario's credit in my book - like he's no longer just a Food Network lackie. So, after pawing through about 10 of his cookbooks at B&N last month, I settled on this one and have not been disappointed with anything so far.

We planted WAY too much zucchini this year, and sadly some of it is going straight from the vine into the compost bin. None of our friends or family, and no one at either of our offices will take any more zucchini, so this recipe was particularly appealing to me!

I was a little nervous about what would happen if we didn't completely remove the stamens from the inside of the flower, but it was actually really easy to do. I mixed the goat cheese in this recipe with some homemade ricotta (I'll post soon) and it was awesome. The tomato "sauce" that goes with it easily deserves it's own post. We've used leftovers of it to dunk crusty bread and it's great. It only gets better after a few days in the fridge. This could easily be a light dinner with a side salad for me.

Fried Zucchini Flowers with Goat Cheese
12 Zucchini Flowers - stamens (and any bugs!) removed
1 cup fresh goat cheese
1 large egg
2 scallions thinly sliced
1/4 tsp. fresh grated nutmeg
1 pound yellow or red grape tomatoes
1/2 cup olive oil for frying (I used a nonstick pan and hardly any oil and they still came out with a great crust)
3 tbl. red wine vinegar
8 fresh basil leaves

In a food processor, combine the tomatoes, vinegar, basil and a little bit of the olive oil. Puree until smooth, strain through a cieve and set aside. In a small bowl combine goat cheese, egg, nutmeg and scallions. To stuff the zucchini flowers I found it easiest to put the filling in a ziplock bag and snip off a small piece of the corner instead of using a spoon to try and fill the delicate flowers. Divide the mixture evenly between the flowers. If frying, heat the oil until smoking and add four flowers at a time, keeping them warm in a low oven if you need to cook them in batches. If pan frying instead, add 6 flowers at a time to a nonstick pan over medium high heat and cook 3-4 minutes on each side, flipping three times to create a brown crust all over. Drain on paper towel. Drizzle the tomatoe sauce over the warm flowers and serve.

Thursday, August 27, 2009

The Best French Onion Soup


With the recent dip in temperatures from mid-90's to 40 degree nights, this has been on my mind big time! It is so simple, and amazingly delicious! Cooking the onions slowly over a low heat is a huge struggle for both my husband and I, since we tend to be more, high-heat, quick sear-type people, but this payoff is well worth the wait.

French Onion Soup
(makes 2 servings)

1 pound sweet yellow onions, thinly cut into 1/2 moons
3-5 springs fresh thyme
1 bay leaf
1/4 teaspoon salt
fresh black pepper
1 teaspoon AP flour
1/2 white wine
2 cups low sodium beef stock
1 cup water
2 1 1/2 inch thick slices of ciabatta bread
(your favorite crusty bread would work perfect)
1 tablespoon olive oil
1 tablespoon butter
1/2 cup grated Gruyere cheese

Add the olive oil and butter to a large pot and place over low heat. Add onions, thyme, bay leaf, salt and pepper. Cook (stirring occasionally) until the onions are deep brown and amazingly soft. Stir in the flour and cook for 1 minute. Add the wine, and increase heat, letting the wine bubble for 2-3 minutes. Add the stock and water, and let the soup simmer for 20-30 minutes. Season with salt and pepper to taste.

Meanwhile, heat the broiler and place a rack in the middle of the oven. Place the bread slices in the middle of the rack and broil, flipping once, until browned on both sides. Remove bay leaf from the soup and ladle into two (broiler safe!) bowls. Top each bowl with a toast and cover generously with cheese. Broil the soup 2-3 minutes or until cheese is golden brown and bubbly. Serve immediately!


Tuna Carpaccio


For those of you who are squeamish about raw fish, you should probably skip this post. Recently my husband found this recipe while killing time on epicurious.com (which takes up far too much of our time), and recreated it with his own take. The result was an amazingly simple carpaccio with just the right balance of salty and tangy.

alic;">Tuna Carpaccio
(adapted from epicurious.com)

4 oz. fresh sushi-grade tuna small bunch watercress
2 oz. fresh parmesean cheese for grating
1 small bunch chives (or scallions)
4 tablespoons aged balsamic vinegar (use the good stuff...a little goes a long way)
2 tablespoons extra virgin olive oil


Cut the tuna into about 1-inch squares. Place each square between two pieces of parchment paper or plastic wrap, and flatten with a meat mallet or small fying pan until very thin. Arrange the pieces on a plate, slightly overlapping. Drizzle with half of the oil and vinegar and sprinkle evenly with kosher salt and fresh ground black pepper.

In a small bowl, combine watercress (arugula would work well too) with remaining oil and vinegar. Toss to combine. Place the watercress salad on top of the tuna in the middle of the plate. Top with shaved parmesean cheese and finish with the diced chives.

Serve alone or with little toasts, crackers - just about anything!

Thursday, May 21, 2009

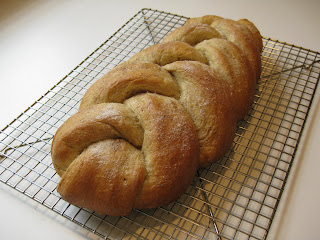
Nisu (Finnish coffee bread)

My husband is Finnish and very proud of this fact. His grandfather was a first generation Finnish American who grew up in Gloucester, MA, a town with a large Finnish population. Back as far as when we were dating, he has talked about the wonder that is nisu, a traditional Finnish coffee bread. He soon insited that I learn how to make it and even gave me his mother's recipe as a not-so-subtle prod. There is still a Finnish bakery in Gloucester where his grandparents used to buy their nisu on the weekends and apparently this is the standard to which I was warned that my attempts would be scrutinized (no pressure!).

I have been trying occasionally for the past several years to make an acceptable nisu and for this most recent attempt, I was determined to combine all of the things that I had done wrong in the past and create the famous "bakery nisu" of my husband's childhood. Judging by his reaction, I'm apparently getting there, as this has been by far my best attempt ever. This bread is a labor of love, and is more involved than any other bread I make, but hey, it got a pretty great reaction from my husband, so I think it's well worth it!

Nisu

3 3/4 cups bread flour
1 egg
4 tbls butter (softened)
2 1/2 tbls sugar + more for sprinkling
2 tsp cardamom + more for sprinkling
1 1/2 tsp salt
1 cup warm water
Glaze:
1 tbls milk
1 egg

Combine 1 tablespoon of sugar with the yeast, and add warm water. Stir to dissolve and let the yeast and sugar bloom together for about 5 minutes. Meanwhile, combine all of the other bread ingredients (except 1 tbls butter) in a stand mixer with the dough hook attachment and mix to combine. Slowly add the proofed yeast mixture and stir until combined, adding warm water and/or sprinkles of flour until the dough comes together and has a smooth consistency. Separate into three even portions and roll into ropes. Rub each rope with remaining tablespoon of butter and sprinkle with a little more sugar and cardamom. Braid the ropes as tightly as possible and place the bread onto a baking sheet. Cover lightly with plastic and leave in a warm place to rise for about 1 hour.
Preheat oven to 350 degrees. Bake for 30 minutes, or until almost golden. Remove from oven and brush with the beaten egg and milk mixture. Sprinkle with even more sugar and cardamom (my husband likes it sweet!). Put back in the oven and bake another 5-10 minutes or until golden brown. Transfer to a wire rack to cool.

The result is a dense, almost cake-like sugar-glazed bread that goes exceptionally well with coffee. Enjoy plain or toasted with...even more butter and sugar!


Monday, May 11, 2009

Treviso Marmalade and Goat Cheese Crostini


This was another recipe from Wine Bar Food, which we've been cooking from every weekend since we got it, and it is so good, not to mention affordable...radiccio and a small package of (naturally lower fat) goat cheese. I used homemade green olive and basil bread that we had in the freezer, but the recipe calls for a plain french bread. Treviso is a variety of radiccio that is used all over Northern Italy, and is abundant at the Rialto Markets in Venice (where we fell in love with it). It's been impossible to find here, but that could be because we live in the sticks of NH. At any rate, the regular round heads of radiccio that are available in our grocery store taste similar enough with a bitter bite and gorgeous purple color.

When we were making this, the smell of the balsamic vinegar for the first few minutes after adding it to the wilted radiccio was almost enough to make me sick, and definitely had me nervous about this snack, but it mellowed out and the final product was delicously sweet with just enough bitterness left.


Treviso Marmalade & Goat Cheese Crostini
Adapted from Wine Bar Food

2 heads of treviso (or round radiccio)
2 tablespoons extra virgin olive oil
2 tablespoons sugar
1/2 cup balsamic vinegar
16 slices of bagette
6 ounzes goat cheese (softened to room temperature)
Fresh basil (optional)

If using the round radiccio, cut each head in quarters and remove the tough stem. Coarsly chop the leaves. Heat olive oil in medium pan over medium heat. Add the radiccio and cook until wilted, stirring frequently (about 5-6 minutes). Stir in the vinegar and sugar, reduce the heat to medium-low and cook until all of the vinegar is evaporated and the mixture has reduced to a jammy consistency, cool to room temperature.

Meanwhile slice the bagette and broil 1-2 minutes on each side until brown. Divide the goat cheese evenly between the slices and spread to cover the toast. Top each crostini with a equal amount of the marmalade and serve, topped with fresh basil if you have it.


Tuesday, April 28, 2009

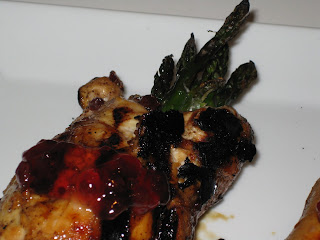
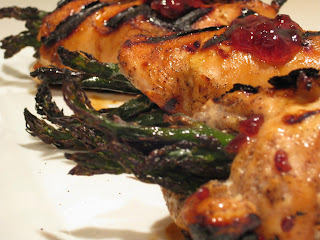
Chicken Asparagus Rollatini with Red Currant Glaze


This is an inexpensive healthy dinner with a nice presentation and fast prep. time. It might make your grill a sticky mess, but the flavor is worth it!


Ingredients (serves 4):

4 well-trimmed chicken breasts
1 bunch asparagus (the thinner the better)
1/2 cup red currants (sometimes sold as "Zante" currants)
6-8 oz. red currant preserve
salt
pepper
olive oil

Preparation:

Pound chicken breasts to 1/2 - 1/4" thick (thickness will effect cooking time and "rollability"),
Brush with olive oil, season with salt and pepper, and set aside,
Trim asparagus and steam approx. 2 minutes then immediately cool down in a cold water bath (this helps to keep them from being overcooked),
Place a small handful of currants and approx. 6-8 pieces of asparagus on chicken and roll tightly,
Secure with kitchen twine or toothpicks,
Brush entire roll with red currant preserve,
Preheat grill to med.-high and cook approx. 5 minutes, flip, brush with preserve and grill for another 5 minutes (or until done),
Plate, remove twine or toothpicks and top with additional red currant preserve